Integrating and Debugging Google Tag Manager with Shopify’s Custom Pixels
Analysing user behaviour and conversion data is essential for the optimization of online store performance. Google Tag Manager (GTM) and custom pixels can help the Shopify merchants to enhance the tracking capabilities. The integration of GTM with Shopify checkout process can be a daunting task due to the platform sandboxed JavaScript environment. This article is an attempt to understand how to integrate Google Tag Manager with Shopify custom pixels, analyse the limitations of GTM's preview mode in this scenario, and offer an alternative solution for debugging with the help of browser console logs.
Why Integrate Google Tag Manager with Shopify?
Google Tag Manager enhances the management of tracking codes such as Google Analytics, Facebook Pixel and other third party scripts. Instead of manual insertion and updating these scripts throughout your Shopify store, GTM allows you to handle all the tags from one central interface. With the help of custom pixels, you can also track crucial user action like adding the items to cart or finishing the purchase and send these data to GTM for advanced tracking and analysis.
However, the GTM integration gets complicated with Shopify sandboxed environment for custom pixels. In result, the GTM preview mode might not work as intended, which results in restricting your ability to test the integration before making the changes live.
Steps to Integrate Google Tag Manager with Shopify Custom Pixels
Step 1: Add Google Tag Manager to ShopifyPixels
First you would need to install Google Tag Manager on your Shopify store by adding the GTM container code to your theme code or by using an app that is supported by GTM integration.
1. Go to Google Tag Manager and create a new container.
2. Copy the container’s GTM-XXXXX ID.
3. In Shopify, navigate to Online Store > Themes > Actions > Edit Code.
4. Open the theme.liquid file and paste the GTM container code just below the tag.
5. Save the changes.
Now, the Google Tag Manager will be installed to your Shopify store and is all set to track
events.
After adding GTM to your store, the next step will be to set up custom pixels for specific
events, like checkout. Follow these steps:
Go to Settings Custom Events in your Shopify admin.
2. Add a new custom pixel by pasting the JavaScript code you want to track (for
example, a pixel for checkout initiation).
3. Replace the GTM-XXXXX placeholder with your actual GTM container ID.
This ensures that the custom pixel triggers relevant events that GTM can process.
Adding Google Tag Manager to Shopify Checkout with Custom Pixels
In your Shopify admin, navigate to "Settings" > "Customer events." Add the example custom
pixels and update GTM-XXXXX with your GTM Container ID.
window.dataLayer = window.dataLayer || []; |
The Sandbox JavaScript Challenge
Because Shopify's uses sandboxed JavaScript for custom pixels, Google Tag Manager’s preview mode won’t work. Instead, GTM will tell you that your container was not found on the page when you try to use Preview Mode.
Debugging Workaround: Using Browser Console Logs
Since GTM’s preview mode doesn’t work for custom pixels in Shopify, you need an alternative method for debugging. The most effective workaround is to use browser console logs to monitor the data layer and custom pixel events as they occur.
Here’s how to implement this workaround:
Creating Log Entries: Adjust your Google Tag Manager container to log data to the console.
You can do this by setting up a trigger that logs the data layer content whenever a custom
pixel is activated.

And firing a custom html tag on that trigger like so:


Latest Datalayer Variable Code
Full Datalayer Variable

Publish Changes: Unlike standard GTM practices where you test changes in preview mode, for custom pixels you must publish changes directly to your live environment for debugging.
Review the Console: After publishing, open your browsers developer console (usually by right-clicking and selecting ;Inspect Element; and navigating to the ; Console; tab). You can then observe the logged data as custom pixel events are triggered.
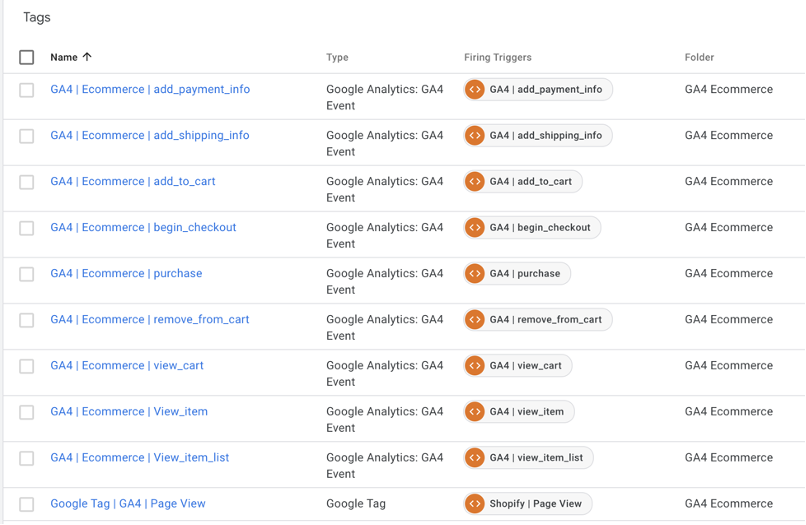
Once you’ve completed these steps, ensure all standard events are created.
Standard Ecommerce Tags

By following the steps in this guide, you'll successfully be able to integrate GTM with
Shopify’s checkout and other standard events, debug the setup with the help of console
logs, and maximise the effectiveness of your tracking system.


